I just love Halloween, it's such a fun Holiday. It is the gateway or portal is you wish to the three months of festivities that are to follow. Thanksgiving is wonderful Holiday a week of cleaning and shopping. Prepping and cooking starts the night before, you spending the whole day eating and feel like a pig when it's all over. Christmas, the most wonderful time of the year as the song goes, has you stressed for 25 plus days buying the perfect gift for everyone. Making time to go to all the parties you have been invited to and let's not mention the party your hosting. And then comes New Years Eve, I'm sure we have all woken up to start the New Year with one mega hang over at some point in our lives.
Halloween is just about the fun. Sure you might have to buy some candy but that is really all the stress involved. You get to see cute kids all dressed up with the rage of the year. Teenagers that want the candy but don't want to get teased by their peers if they go all out on a costume. And of course the grown-ups that get all into it like me.
As part of my Halloween decoration I decorated the Urns by my front door. As you can see they did need to be spruced up. The Geranium were moved to the garden.
The elements I am using to convert the urns from summer to Halloween is pumpkins, twig garland and black spider web type cloth.
I left the vines that were already growing in the urns from my Summer plantings. I wrapped the twig garland around the urns. Placed a white pumpkin on top and draped the black spider web on top of it all.
To age it even more I place Spanish moss in the webbing and by the pumpkins. Here a view of how both urns turned out
I just love the way it turned out. So spooky!! It actually looks like they been there forever LOL
It's awesome you stopped by.....Thanks!!!
XOXO
Esther
Wednesday, October 26, 2011
Sunday, October 23, 2011
Photo Class
I took a photo class from Outward Bound. It was held in Central Park. I was so excited to see a hidden gem inside of the park, at least to me. I never been to the conservatory in Central Park. It was indeed very beautiful. The teacher was really nice. I felt a little lost because my camera a Nikon Coolpix L100 while not a point and shoot it doesn't have aperture or f-stop setting. She had told me to use the landscape setting and the close up setting for the class. Here are some photos I took.
She talked about setting up the shot that the object doesn't necessarily have to be in the middle of a picture as in this one that she liked.
Because the flower cuts across the picture to the main point of interest, the butterfly. And she liked this one as well for composition.
This photo I took, she had hoped someone would notice the scene and snap the shot.
Notice all the heads popping out of the hedges. Looks kind of funny doesn't it. This is how she said it should be cropped.
This shot I took by the pond.
Her suggestion for more interest.
This one she asked how I set it up and that if was framed really well. I felt to good
Here is what I learned. Take your time when setting up a shot. Like my heads popping out of the hedges would have been better had I taken my time. Don't be timid so ahead and ask people if you can take their picture. I missed a shot of someone whose sense of fashion was spectacular because I was to shy to ask for a pose. Be patience and take tons of photos of the subject of different angles and using the light setting of your camera. It just might take 20 shots to get the one you are after.
It's awesome you stopped by!!....Thanks
XOXO
Esther
She talked about setting up the shot that the object doesn't necessarily have to be in the middle of a picture as in this one that she liked.
Because the flower cuts across the picture to the main point of interest, the butterfly. And she liked this one as well for composition.
This photo I took, she had hoped someone would notice the scene and snap the shot.
Her suggestion for more interest.
This one she asked how I set it up and that if was framed really well. I felt to good
Here is what I learned. Take your time when setting up a shot. Like my heads popping out of the hedges would have been better had I taken my time. Don't be timid so ahead and ask people if you can take their picture. I missed a shot of someone whose sense of fashion was spectacular because I was to shy to ask for a pose. Be patience and take tons of photos of the subject of different angles and using the light setting of your camera. It just might take 20 shots to get the one you are after.
It's awesome you stopped by!!....Thanks
XOXO
Esther
Thursday, October 20, 2011
Pumpkin Polenta with Chorizo and Black Beans
On my quest to cook through all my saved recipes I found this one. It sounded soo yummy.
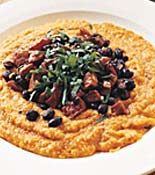
By: Rachael Ray
The part that intrigued me the most was the pumpkin polenta. Here is a shot during the cooking.
I cooked the onions a little more than what the recipe calls for waiting for the onions to just turn translucent.
I was right the Pumpkin Polenta, was amazing. I will be doing that part of the recipe again. I did find the Chorizo mix a bit to overwhelming. I would have rathered have had more beans less Chorizo. But this could be that I used Boars Head brand rather than a Spanish brand. Don't get me wrong I did enjoy the recipe it was quite delicious.
I could also see using the recipe as a Tapa by letting the Pumpkin Polenta set up. cut it into squares or cut out circles. Frying the polenta nice and crisp. Than using a spoonful of the topping to finish it off. Another thought would be to use the Chorizo topping as an omelet filler.
The recipe is below
It's awesome you stopped by...Thanks!!!
XOXO
Esther
Pumpkin Polenta with Chorizo and Black Beans
November/December 2005

From: 30-Minute Meals » 4 Servings
Ingredients
- 1 tablespoon extra-virgin olive oil (EVOO), 1 turn of the pan
- 3/4 pound chorizo, casings removed (if desired) and meat chopped
- 1 medium onion, chopped
- One 14-ounce can black beans, rinsed and drained
- 2 pimiento peppers or roasted red peppers, chopped
- 3 cups chicken stock
- 2 tablespoons unsalted butter
- One 14-ounce can pumpkin puree
- 1 cup quick-cooking or instant polenta
- 1 tablespoon fresh thyme, chopped
- Salt and freshly ground pepper
- 1 cup shredded Manchego cheese
- 1/4 cup chopped flat-leaf parsley (a generous handful)
Directions:
- Heat a medium nonstick skillet over medium-high heat. Add the EVOO (1 turn of the pan) and the chorizo. Cook 1 to 2 minutes, then add the onion and cook for another 3 to 4 minutes. Add the black beans and the pimientos and heat through, another 1 to 2 minutes.
- In a large saucepan, bring the chicken stock and butter to a boil and stir in the pumpkin. Return to a boil, whisk in the polenta and stir until it masses together, 2 minutes. (Watch out for splatters.) Remove the polenta from the heat and add the thyme, salt, pepper and cheese. Adjust the seasonings. Pile the polenta on plates and top with the chorizo and beans. Garnish with the chopped parsley and serve.
Monday, October 17, 2011
Halloween Card
Every Holiday I try to come up with a new design for cards to send to my friends and family. I made this card for Halloween this year. When I was coming up with this idea for the card I had stopped by AC Moore, my local arts and crafts store. I found this flocking powder that made the spider look and feel fuzzy.
Looks real doesn't it. Do make this card I used yellow and green card stock, a Halloween stamp set, orange and black ink pad, brown distress ink, white puff fabric paint for the eyes and of course the flocking powder.
I started by cutting my paper to size and using a boning tool to crease the cards. Next I distressed the front of the cards using the distressing ink and the orange ink pad.
I then took the web stamp and using black ink I stamped the two opposite corners.
Finally I stamped the spider using a black pen draw a line down to the spider. I punched out three circles to stamp the word BOO and distressed them as well using the orange and black ink pads.
I filled in the eyes with the white puffy paint. Waited for it to dry using glue filled in the body of the spider I sprinkled the flocking powder.
I used dimensional stickers on the word BOO to give the depth and my card was done. I wanted to use the work EEK but I didn't have a the proper front type to get the right effect. But I think BOO works here.
It's awesome you stopped by.... Thanks!!
XOXO
Esther
Saturday, October 15, 2011
A touch of fall
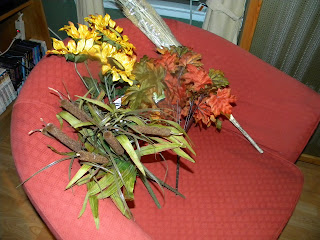
Don't you just love the changing of the leaves. It seems like over night the trees just burst into flames, with colors of yellows, reds and oranges. My all time favorite is spotting a tree this is completely orange and the sun shining on it. It looks like its a dazzling fire engulfing the tree and exploding out of it at the same time. I'm looking forward to this season's display. In the spirit capturing some of this awesome fall show I gathered come leaves and placed it into a vase.
I've seen a similar idea in Better Homes and Gardens with branches framing a door. I just can't bring myself to actually cut down a branch from a tree. So I'll stick with what hits the floor naturally. LOL
Now I have some fall color in my room!!
It's awesome you stopped by...Thanks!!
XOXO
Esther
I've seen a similar idea in Better Homes and Gardens with branches framing a door. I just can't bring myself to actually cut down a branch from a tree. So I'll stick with what hits the floor naturally. LOL
Now I have some fall color in my room!!
It's awesome you stopped by...Thanks!!
XOXO
Esther
Thursday, October 13, 2011
Crispy Coconut Shrimp and Broccoli with Lime Dressing
I tried this recipe from my pile, this one is from Martha Stewart. It was totally awesome!!
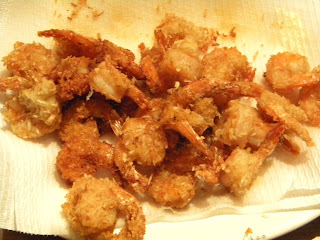
I couldn't stop eating the shrimp. I made the recipe exactly as written. They had a slight sweet favor to them and you could so taste the coconut. Without being overwhelmingly coco nutty sweet. The sauce I served was the Adult one with curry and yogurt. I used Greek yogurt because that is what I had in my fridge and I didn't have the Madras Curry called for in the recipe. I did find using the regular curry a little weak, wished I put more in. I'll have to make this recipe again using the Madras Curry to see if there is a difference. If you know the difference please leave a comment with an explanation.
I served it with steamed Broccoli and a Lime Dressing and rice. I usually make my Broccoli sauteed with garlic and oil. I really enjoy this new variation. The flavor had a slight Oriental taste to it. Pairing itself with the shrimp perfectly.
The Shrimp were really simple to make and so very delicious. Other ways I though of to use this shrimp recipe is as an appetizer. My hints for make these recipes would be make sure your all set up before you start heating the oil. I started to batter the shrimp when I turned on the oil. At the beginning it worked but I quickly ran out of battered Shrimp and was rushing to batter more before the oiled burned.
It's awesome you stopped by....Thanks!!
XOXO
Esther
Recipes follow
Crispy Coconut Shrimp
Everyday Food, September 2005
Prep Time 35 minutes
Total Time 35 minutes
Yield Serves 4
Ingredients
1 1/2 cups sweetened shredded coconut
3/4 cup plain dried breadcrumbs
2 large egg whites
1 1/2 pounds medium shrimp, peeled and deveined (tail on)
Coarse salt and ground pepper
4 cups vegetable oil
Bottled sweet-and-sour sauce, for serving
1/2 cup plain yogurt
1 tablespoon freshly squeezed lime juice
1 teaspoon Dijon mustard
1/4 teaspoon curry powder, preferably Madras
Lime wedges, for serving (optional)
Directions
1. For the kids: In a food processor, pulse together coconut and breadcrumbs until coconut is in small pieces; transfer to a shallow bowl, and scatter a handful over a baking sheet. Set aside. In another shallow bowl, lightly beat the egg whites.
2. Toss shrimp with 1 teaspoon salt and 1/4 teaspoon pepper. Working in batches, dip shrimp in egg whites to coat completely; lift from whites (shaking off any excess), and dredge in coconut mixture. Lay on prepared baking sheet.
3. In a large, deep heavy-bottom pan, heat oil over medium heat until 350 degrees on a deep-fry thermometer. Cook half the shrimp, lightly shaking to separate shrimp, until golden brown, 2 to 4 minutes. Use a slotted spoon to transfer shrimp to paper towels to drain. Return oil to 350 degrees; repeat with remaining shrimp.
4. Reserve half the shrimp for the adults. Serve remaining shrimp with sweet-and-sour sauce.
5. For the adults: In a small bowl, whisk together yogurt, lime juice, mustard, and curry powder. Serve the sauce with reserved shrimp; garnish with lime wedges, if desired.
Steamed Broccoli With Lime Dressing
Prep Time 15 minutes
Total Time 15 minutes
Yield Serves 4
Ingredients
1 1/4 pounds (1 large bunch) broccoli
1 tablespoon freshly squeezed lime juice
1/2 teaspoon toasted sesame oil
Coarse salt
Directions
1. Prepare broccoli: Cut off and discard tough ends of stalks, leaving about 2 inches attached to the florets. Using a paring knife, cut broccoli lengthwise into pieces. With a sturdy vegetable peeler (or sharp knife), peel away the tough outer layer from the stalks. In a large pot fitted with a steamer basket, bring 1 inch of water to a boil. Add broccoli pieces in a single layer. Cover, and steam until tender, about 5 minutes.
2. Meanwhile, in a large bowl, whisk together lime juice and sesame oil; season with salt.
3. Add broccoli to dressing; toss lightly to coat. Serve immediately
Tuesday, October 11, 2011
Crispy Pancetta, Burrata, and Tomato Sandwiches
I have tons of recipes that collected over the years. Many I have tried but most I have not. I have challenged myself to do two of my saved recipes a week. I will only post the ones that I absolutely love. I will share photos of my dish any changes I made and of course the recipe.
Here is the first one I did.
I call it a play on the BLT. The first step in the recipe is to marinade the tomatoes. I got to use some of the tomatoes from my garden. You will want to make sure you have really ripe tomatoes.It so added to the flavor. The tomatoes were so delicious I ate the left overs as a tomato salad.
I cooked it nice and crisp. And I cut up the Burrata. Just look at the creamy center. It's so yummy!!
Here is the sandwich all done.
This sandwich was out of this world. The flavors just melded together so perfectly. The creaminess of the burrata and the saltiness of the pancetta. The marinaded tomatoes just yummy, yummy, yummy. The only change I made was to put the sandwich on Italian bread vs the brioche the recipe called for.
Here is the recipe that originally ran in Bon Appetit 2007


Here is the first one I did.
I call it a play on the BLT. The first step in the recipe is to marinade the tomatoes. I got to use some of the tomatoes from my garden. You will want to make sure you have really ripe tomatoes.It so added to the flavor. The tomatoes were so delicious I ate the left overs as a tomato salad.
The next step was to cook the pancetta.
I cooked it nice and crisp. And I cut up the Burrata. Just look at the creamy center. It's so yummy!!
Here is the sandwich all done.
This sandwich was out of this world. The flavors just melded together so perfectly. The creaminess of the burrata and the saltiness of the pancetta. The marinaded tomatoes just yummy, yummy, yummy. The only change I made was to put the sandwich on Italian bread vs the brioche the recipe called for.
Here is the recipe that originally ran in Bon Appetit 2007
You'll find burrata cheese at some supermarkets and at specialty foods stores, Italian markets, and cheese shops.
6 servings
August 2007


Ingredients
- 4(3-ounce) packages thinly sliced pancetta (Italian bacon)
- 6(3- to 4-inch-diameter, 3/4-inch-thick) slices ripe Costoluto Genovese tomatoes or other ripe red heirloom tomatoes
- 1/2cup(packed) coarsely torn fresh basil leaves
- 6tablespoonsextra-virgin olive oil
- 2teaspoonsdried oregano
- 1/2teaspoonfleur de sel or coarse kosher salt
- Freshly ground black pepper
- 12(4 x 4 x 1/2-inch) slices egg bread or brioche, lightly toasted
- 18ouncesburrata cheese
- 4cups(about) baby arugula or mixed microgreens
Preparation
- Working in batches, cook pancetta in heavy large skillet over medium heat until brown and crisp, about 6 minutes per batch. Transfer to paper towels to drain. DO AHEAD Can be made 2 hours ahead. Let stand at room temperature.
- Place tomato slices in shallow baking dish. Add basil, olive oil, oregano, and fleur de sel. Sprinkle with ground black pepper and turn to coat. Let stand at least 30 minutes and up to 1 hour.
- Place 6 toasted bread slices on work surface. Divide burrata among bread slices and spread to edges. Top each with 1 tomato slice, then pancetta slices, dividing equally. Top with arugula. Cover with remaining 6 toasted bread slices, and press each slightly to adhere. Cut each sandwich in half and serve.
Saturday, October 8, 2011
An Autum Bouquet
Michaeals Art and Craft store was having an awesome sale on thier Fall Flowers. When I went to check it out I fell in love with these
I also bought this basket. It has the shape of a pumkin.
I filled the basket with florsit foam. My first step was putting in all the tall item a slowly filling in the basket.
Here is a picture of the final piece.
Now I'm ready for the Fall season and don't have to worry about getting flowers.
It's awesome you stopped by....Thanks!!
XOXO
Esther
Thursday, October 6, 2011
Brimfield Antique Show
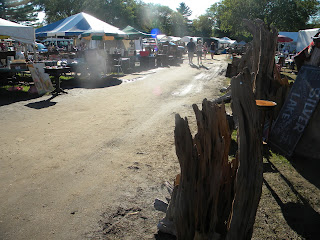
Brimfield Antique Show http://brimfield.com/ is my most guiltiest of pleasure ranking up there with chocolate. Yup that good. There and hundreds of vendors selling from good old fashion antiques that are either in "as is" quality to totally re-furbished. Items that have been hand crafted to thing recently salvaged. What ever your little hearts desire I'm sure you can find it here. I've been to this show 4 times now, and I never able to see all the vendors. Here are a few photos of the show
This year I was on the look out for corbels. And I found some!! Three different types of designs all with an aged feel I was hoping for. One set even has the mounting brackets all done for me.
This year I was on the look out for corbels. And I found some!! Three different types of designs all with an aged feel I was hoping for. One set even has the mounting brackets all done for me.
I will be using them to hold up some shelves in the kitchen. I'll be redoing the kitchen soon and I'm going for a Tuscan farmhouse look in there. I think the corbels will add a nice rustic touch.
I love the Brimfield Antique Show for several reasons. The variety of items you can find, ideas you get, the fun of the hunt and the bargains. I got my lot of corbels for a mere $90.00. I had spied several on eBay for $35.00 or more per corbel. So you know I was doing my chicken strut and singing "I got myself a bargain...I got myself a bargain"
The show is held 3 times a year and I plan on going again next year. So check out their website and let me know if you want to go bargain hunting with me.
It's awesome you stopped by....Thanks!!
XOXO
Esther
Tuesday, October 4, 2011
Harvest on the Hudson
Harvest on the Hudson http://harvest2000.com/hoh/ is right on the Hudson river located close to the Hastings on the Hudson train station. The building is beautiful with high ceilings and great views of the river. The landscaping is equally as beautiful. I hear there is a path you can walk around in. I haven't actually seen it for myself. I have been twice and the service has been good.
We had delicious zucchini flowers for appetizer. They were battered and served with a very good sauce. I wish there was more of the sauce to go with the flowers.
One of my Aunt's had this veal dish it was served with a salad the dressing was really good.
She said it was amazing. My other Aunt had a salmon dish.
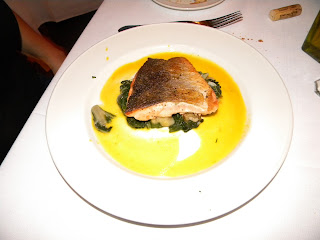
The sauce served with the Salmon was amazing and the fish was do to perfection. I ordered Prime Rib. With Prime Rib depending on the temperature you want will determine the cut you get. The rarer you want the more in middle of you get more well done closer to the end you get. I usually order an end cut. I find the end cuts to be tastier and more flavorful. But this night I was in the mood for a medium rare.
And that is exactly what I got. OMG was this amazing. I am so glad I ordered it. Those of you who know me know my most favorite cut of beef is the NY Strip and Prime Rib is close to my last. But is dish was really really good.
Of course we can't forget dessert. We had a apple crepe and a chocolate lava cake. They both were simple delicious.
I high recommend this restaurant. You will enjoy the atmosphere, views, service and of course the food.
It's awesome you stopped by....Thanks
XOXO
Esther
Saturday, October 1, 2011
A BBQ Party
About a month ago I hosted what I hope to be an annual BBQ party. I had so much fun planning the meal and setting up the atmosphere for my guest. I had decided on making the look of the BBQ a French Country setting with a touch of tropical. Yes I know not a usual combination. As for the menu we had Flat breads on the grill, grilled veggies, steak, chicken and rainbow trout. Dessert was cupcakes and chocolate cake which were so kindly brought by my Aunt and my dear friend.
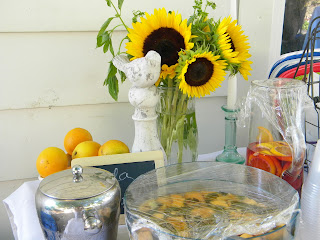
I used a ton of sunflower placed all over the backyard. I used Kale, Collar Greens and Basil from my garden as filler. You can see the Kale in the picture above
I also placed little chalk boards around to welcome my guests and to let them know with ease where they could find the food and drink.
You can just about make out the drink sign here.
This is one of the 3 kinds of flat breads I made. We had brie with prosciutto, goat cheese fig and arugula and the in the picture was caramelized onions, sausage and Manchego cheese. So easy to make. The one trick I learned after the first batch was to cook the pizza dough on both sides before adding the topping this made for a much more crispy flat bread. We also had this yummy bean dip and salsa my sister brought over. Sorry I forgot to take pictures.
To make things super easy for everyone I wrapped the utensils in a napkin and tied everything with a ribbon.
The plates and utensil packets were placed into a basket. Everything in one place. I could have done this with out the help of my Aunt she volunteered to wrap the utensils
As for the main meal we had an assortment of grilled veggies
And this super fresh rainbow trout I bought from Whole foods. The fish monger there was so extremely helpful from picking out which fish to buy to how to prepare it. I followed his instructions to the tee and the fish came out perfect.
Of course we can't forget the bread. I just love the basket full of bread. Not only are they good to eat but they also add a decorative touch to the table . This basket was filled with baguettes, Asiago cheese baguette and a round loaf.
I used a ton of sunflower placed all over the backyard. I used Kale, Collar Greens and Basil from my garden as filler. You can see the Kale in the picture above
I also placed little chalk boards around to welcome my guests and to let them know with ease where they could find the food and drink.
Here is the canopy again. And you'll see a nice palm in the corner to add that touch of tropics to the room. I also think the green and canopy gave a slight tropical feel.
The plates and utensil packets were placed into a basket. Everything in one place. I could have done this with out the help of my Aunt she volunteered to wrap the utensils
As for the main meal we had an assortment of grilled veggies
And this super fresh rainbow trout I bought from Whole foods. The fish monger there was so extremely helpful from picking out which fish to buy to how to prepare it. I followed his instructions to the tee and the fish came out perfect.
Of course we can't forget the bread. I just love the basket full of bread. Not only are they good to eat but they also add a decorative touch to the table . This basket was filled with baguettes, Asiago cheese baguette and a round loaf.
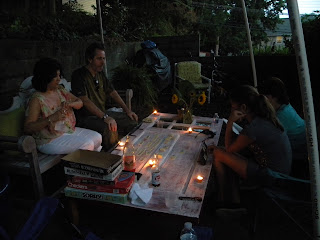
We partied and BBQ'd till dark. When the bugs started to come out we lit some citronella candles I found at Home Goods in the clearance aisle. They were simply amazing and quite strong. Not a bug dared to bother us. I'll have to look for them again next year.
It's awesome you stopped by.....Thanks!!
XOXO
Esther
Subscribe to:
Posts (Atom)


